How To Download Screen Shareon Discord
6 Ways How to Fix Discord Black Screen Share on Mac
Discord is a free app that allows people to interact using text messages, videos, and voice. One of the best Discord features is the ability to share your screen with others while playing games or using other apps. Sometimes the screen share feature can stop working, and you'll keep seeing a black screen.
There are a few reasons why the screen share feature can stop working. If Discord doesn't recognize the software you're running, the share screen won't work. All you need to do to solve this issue is add your activity status manually, and the screen share feature should start working.
If Discord doesn't have all the permission, it needs to share or record your screen; the feature won't work. Corrupted Discord files can also prevent the screen sharing function from working. When that happens, the best thing to do is to delete those files and reinstall the Discord app again.
If you don't know the cause, we recommend following the methods below from top to bottom to find and solve the issue.
Video on How to Fix Discord Black Screen When Sharing Your Screen on Mac?
Table of Contents:
- Introduction
- Method 1. Add Activity Status to Your Discord Profile
- Method 2. Give Discord Screen Recording Permission
- Method 3. Reinstall Discord App
- Method 4. Disable Screen Capture With Lates Technology Setting
- Method 5. Use the Windowed Mode
- Method 6. Disable Hardware Acceleration
- Video on How to Fix Discord Black Screen When Sharing Your Screen on Mac?
Add Activity Status to Your Discord Profile
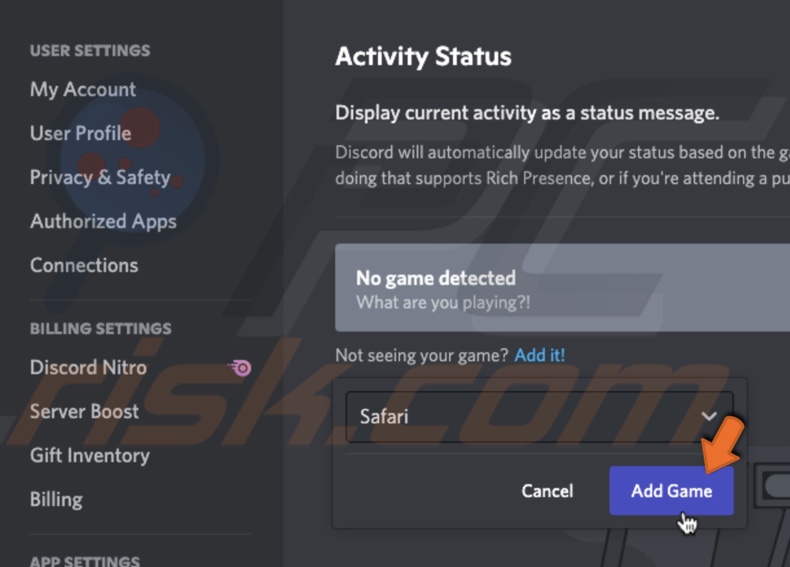
If you're having problems sharing your screen when playing a game or running software, add the activity to your Discord profile. Then, when you enable screen sharing, Discord will list added activity as a running application and update your status.
To add activity status to your discord profile, follow the steps below:
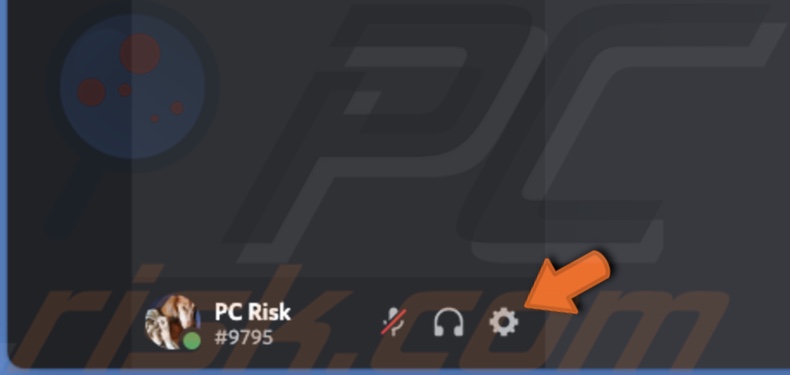
1. Open the "Discord" app.
2. At the bottom left corner, click on the gear icon.
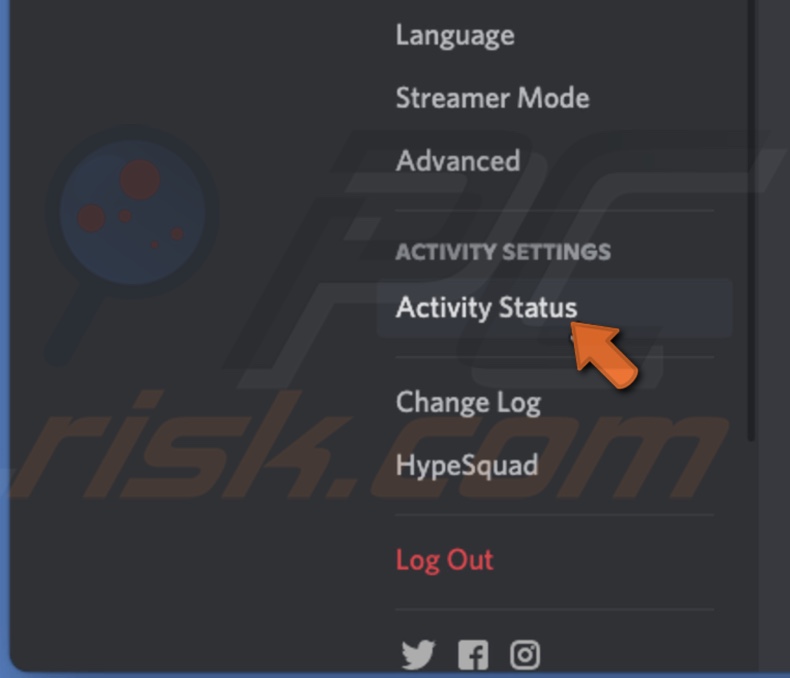
3. In the left sidebar, scroll down and click on "Activity Status".
4. If no running application is identified, next to "Not seeing your game?" click on "Add it!".
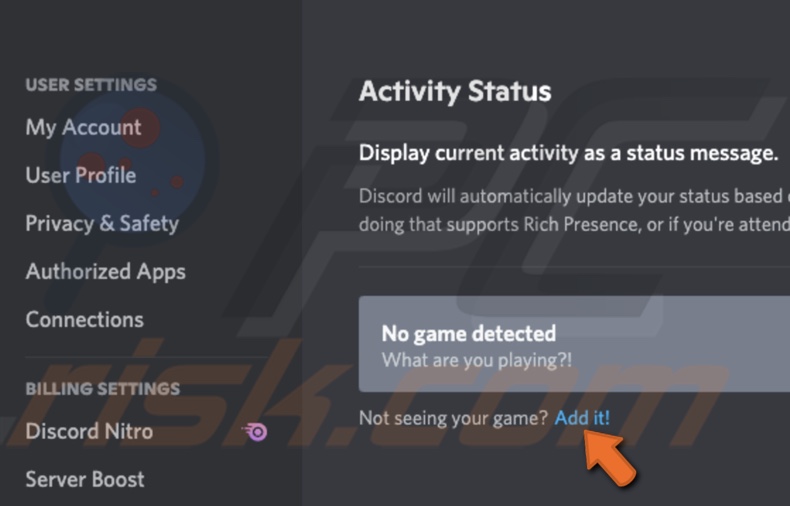
5. From the drop-down menu, select the app that's running on your desktop.
6. Then, click on "Add Game".
Now, try to share your screen. It should start working as Discord will not identify the running application.
[Back to Table of Contents]
Give Discord Screen Recording Permission
When sharing a screen in Discord, you need to make sure it has all the necessary permissions to do that. Otherwise, screen sharing won't work.
To give Discord screen-sharing permission, follow the steps below:
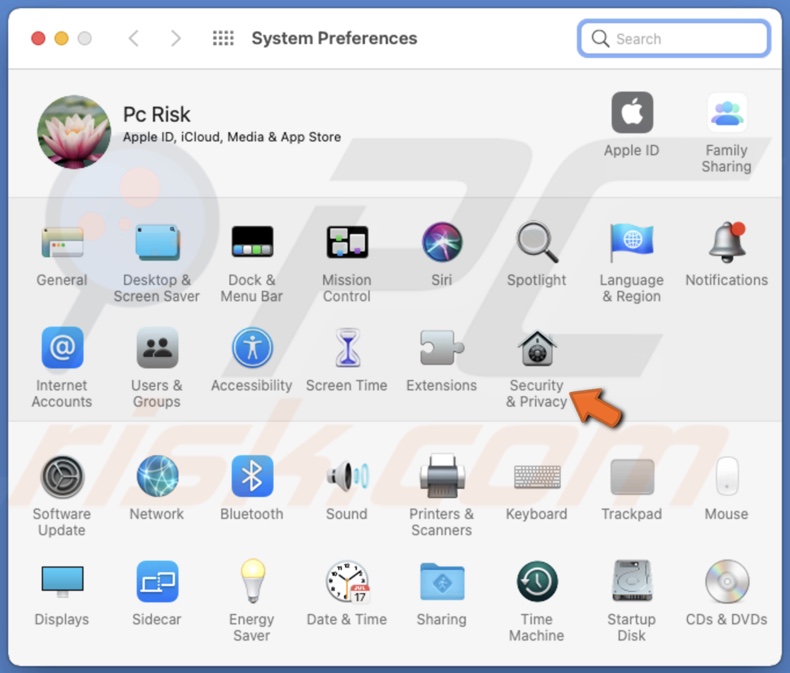
1. Click on the Apple logo and go to "System Preferences".
2. Go to "Security & Privacy" settings.
3. Then, go to the "Privacy" tab.
4. In the left menu sidebar, search for "Screen Recording" and select it.
5. Now, click on the lock icon and enter your Mac's password.
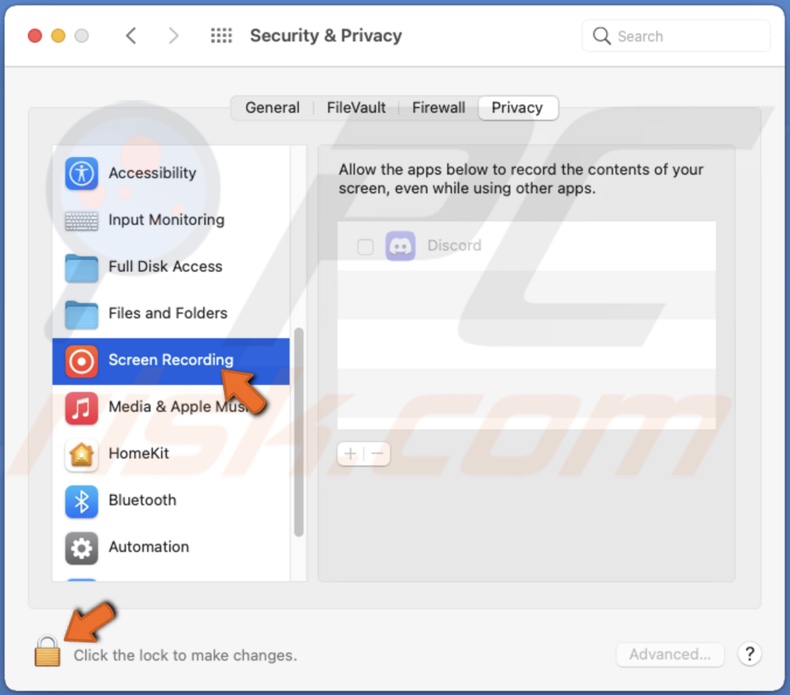
6. Check the box next to "Discord" to allow the app to read and record your Mac screen.
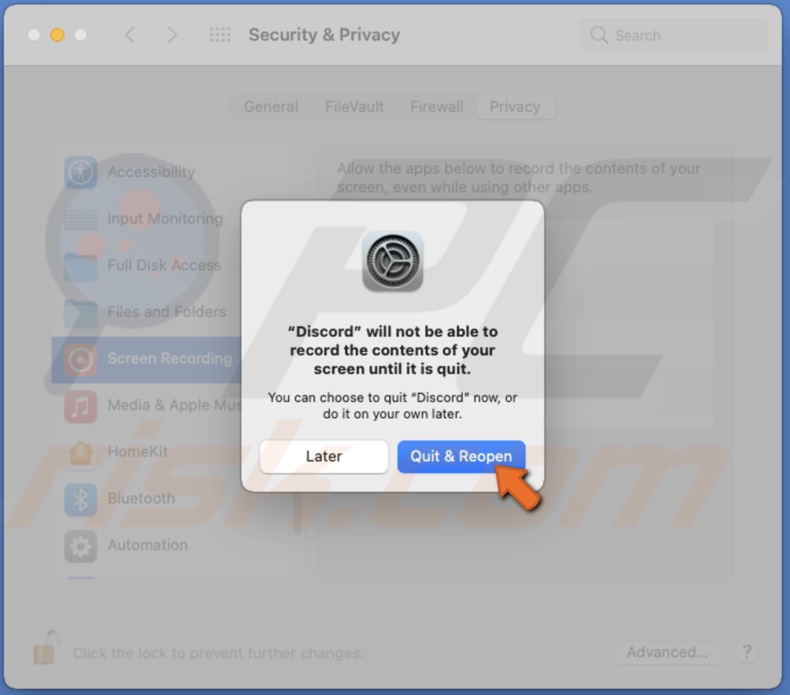
7. Then, click on "Quit & Reopen". Now try to share your screen.
If you're sharing a screen using a browser, you should get asked for permission every time you start a session.
[Back to Table of Contents]
Reinstall Discord App
This method, for sure, should fix the issues with screen sharing. You'll need to uninstall the app delete all its data. Then re-download it.
To reinstall Discord, follow the steps below:
1. Open the Finder window.
2. Go to the "Applications" folder.
3. Locate the Discord app and right-click on it.
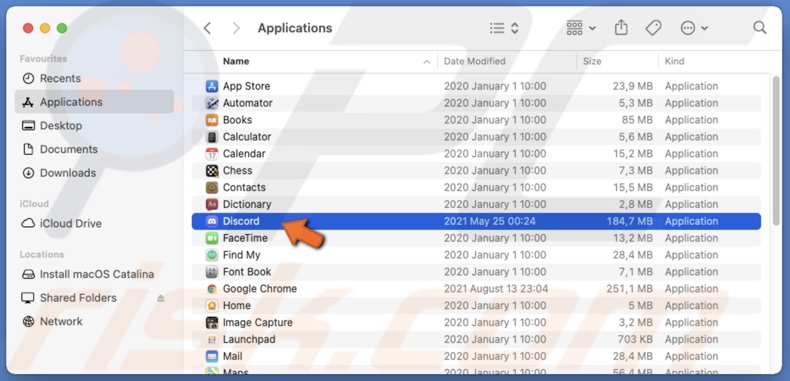
4. Then, click on "Move to Trash" or drag it to "Trash" yourself.
5. Now, from the menu bar, click on "Go" and select "Go to Folder".
6. In the path bar, enter: ~/Library/Application Support/
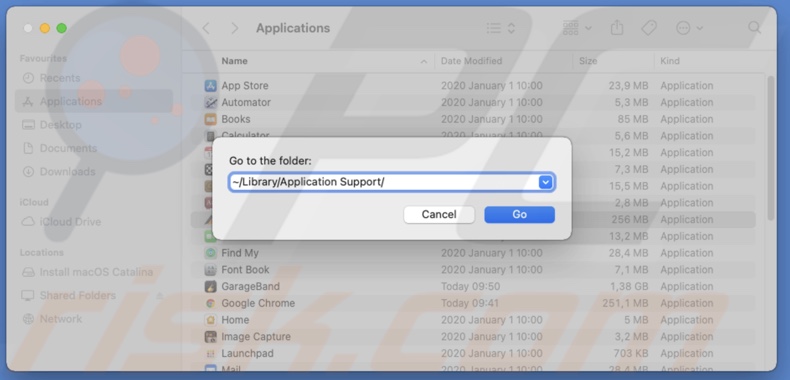
7. Find the Discord file, right-click on it, select "Move to Tash", or drag the file to "Trash" yourself.
8. Then, click on "Go" and select "Go to Folder" again.
9. In the path bar, enter: ~/Library/Cookies/
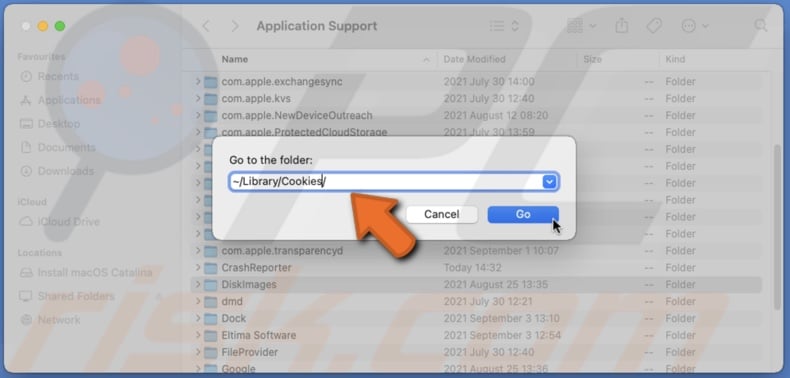
10. Locate Discord files and delete them by right-clicking on them and selecting "Move to Tash" or dragging the files to "Trash".
11. Now download Discord again and check the screen sharing feature. It should work normally.
[Back to Table of Contents]
Disable Screen Capture With Lates Technology Setting
Sometimes, settings like screen capture with the latest technology can prevent screen sharing from working. Some users reported that by disabling this option, the screen sharing features started to work as normal. If you no longer see this option in the settings, go to the next step.
To disable screen capture with the latest technology, follow the steps below:
1. Open the "Discord" app.
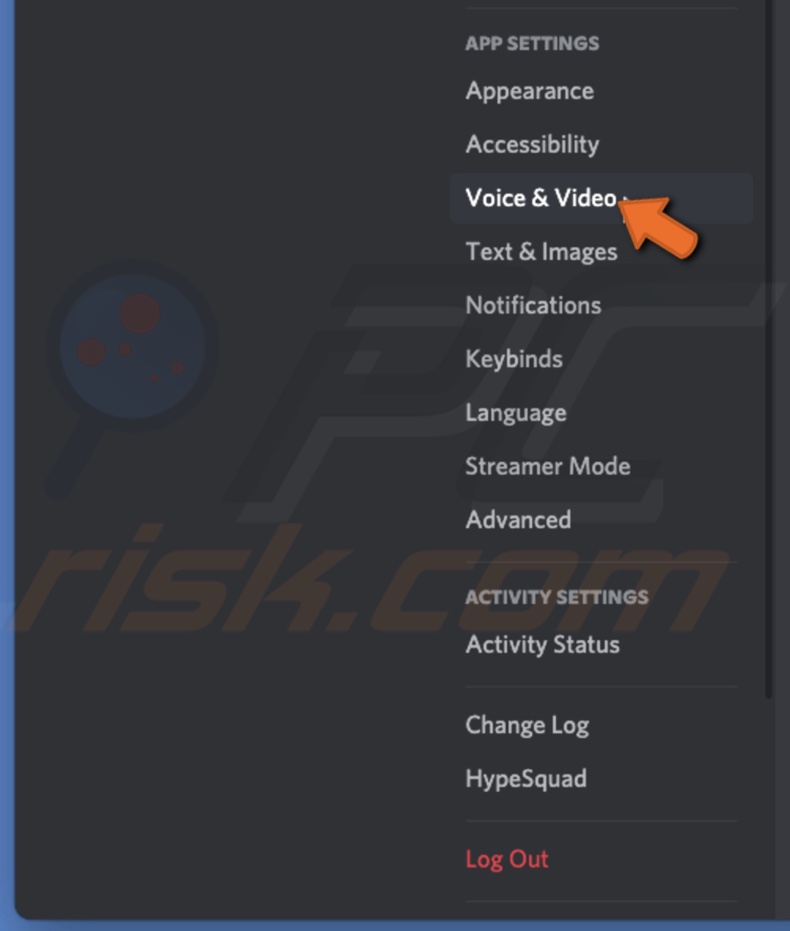
2. In the bottom left corner, click on the gear icon.
3. From the menu, click on "Voice & Video".
4. Scroll down to the "Voice Diagnostics" section.
5. Then, next to "Use our latest technology to capture your screen", toggle the switch to disable the feature.
Now check if the screen sharing feature works.
[Back to Table of Contents]
Use the Windowed Mode
Another reason for seeing a black screen while trying to share your screen is if the application is in full screen. That's because Discord doesn't support screen sharing for applications in full screen. For the screen sharing to work, you need to minimize the app window.
[Back to Table of Contents]
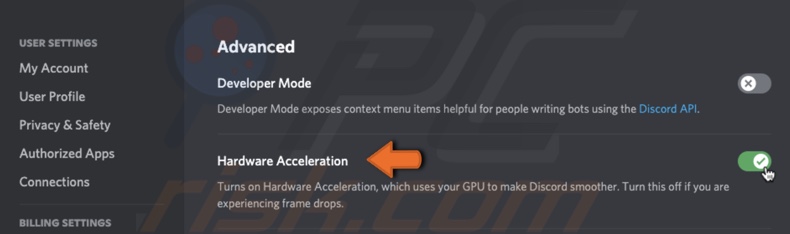
Disable Hardware Acceleration
If the screen recording is still not working or it keeps glitching, disable the hardware acceleration. If you have an older Mac, it might have problems functioning as this feature uses more power of your graphic card.
To disable hardware acceleration, follow the steps below:
1. Open the "Discord" app.
2. In the bottom left corner, click on the gear icon.
3. From the menu, click on "Voice & Video".
4. Scroll down to the "Video Codec" section.
5. Next to "H.264 Hardware Acceleration", toggle the switch to turn off the feature.
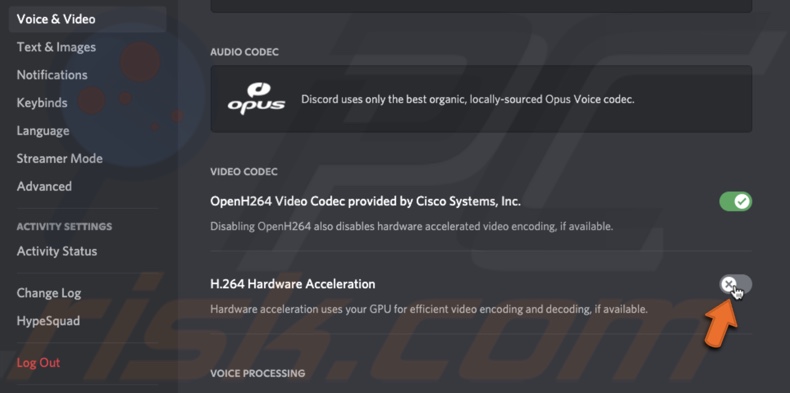
6. If you see frame drops, go to "Advances" settings.

7. Disable "Hardware Acceleration" there as well.
We hope you found the information you were looking for and managed to fix the Discord screen sharing feature.
[Back to Top]
About the author:

I am passionate about computer security and technology. I have an experience of 10 years working in various companies related to computer technical issue solving and Internet security. I have been working as an editor for pcrisk.com since 2010. Follow me on Twitter to stay informed about the latest tech news or online security threats. Contact Tomas Meskauskas.
Our guides are free. However, if you want to support us you can send us a donation.
Source: https://blog.pcrisk.com/mac/13494-how-to-fix-discord-black-screen-when-sharing-your-screen-on-mac
Posted by: gilbertokime0193673.blogspot.com

Post a Comment for "How To Download Screen Shareon Discord"